

Updated my bios before bed. Going to install and run memory tests on the XMP profile of my memory tomorrow.
Installed the new cpu and starting memory tuning. I can get up to 3666 mhz on 16/20/20/40 timings before I am unable to boot into Windows. This is a huge improvement over my 2700x which often couldn't even boot into Windows at 3200 mhz.
Now to stress test and hope I don't have to bump the memory frequency down.
Now to stress test and hope I don't have to bump the memory frequency down.
10 Minutes into an OCCT memory test and the all-core CPU frequency is holding at 4.52 GHz. I haven't really bothered enabling PBO or anything, yet, I don't think. Temp is 57C on fairly quiet air cooling.
Preliminary testing had me downgrade to 3600 speed (mobo bios barfed on a reboot after some fan curve changes). Will run another memory test overnight to make 100% sure this is stable. Gonna play some games and shit now, though.
Oh weird, my bios can't restart properly after changing fan curves. I may be able to go higher than 3666, after all!7
e: also, this version of the bios doesn't let me turn the fans off below certain speeds. the fan speed management in this version is really awful. i can't get a good balance going.
e: also, this version of the bios doesn't let me turn the fans off below certain speeds. the fan speed management in this version is really awful. i can't get a good balance going.
Finally got my fan curves tolerable. Tried increasing RAM speed again and it always gives up if I try to go above 3666. Oh well, this is still light years beyond the 2933 I had with the 2700x. Same mobo, same memory, just different CPU. Man, that memory controller fucking sucked.
e: this is with four sticks of 8GB 3600-rated B-die ram
e: this is with four sticks of 8GB 3600-rated B-die ram
lmao my work projects completely load in like 1/3 -1/4 of the time I'm used to
Chivalry 2 is much smoother, too
this is wonderful
Chivalry 2 is much smoother, too
this is wonderful


Does anybody know if minipc.de is reliable/safe?
Looking to make that home server/NAS and pick this board up, because it’s the only place I can find it in stock: https://www.minipc.de/catalog/il/2966
Looking to make that home server/NAS and pick this board up, because it’s the only place I can find it in stock: https://www.minipc.de/catalog/il/2966


Took me almost an hour to get it in there. Runs fine, so that's great, however the card is so big that I had to move the pci-e raiser and gpu mounting posts to the lowest / bottom position, which unfortunately meant getting rid of the custom dp / hdmi extension panel.
What's worse is that the inputs on the Gigabyte are rotated 180° compared to those on the FE, rendering the extensions I ordered useless. The motherboard's mounting plate is in the way and there's no way around that. So that's 80€ down the drain, unless the Chinese agree to take them back and replace them with longer extensions (at least 30-40cm, as I'd have to move the panel further up the back side of the case) that are also properly aligned. That's likely another 3-4 weeks of waiting to be done with this build, sigh.
Also, the hdmi 2.1 extension cable does not play well with the LG C9. Not only it won't do 40-48gbps, it won't even do 18gbs + display stream compression. The most I managed to achieve was 1920x1080 @ 60hz, I think, which is hdmi 1.2 levels of bandwidth. I've only tried that extension with the 3070ti though, maybe the Gigabyte will play nice with it. Wouldn't be unheard of, considering how picky the C9 is in this regard.
Vapes, how did you connect your old gpu to the OLED? HDMI -> DP adapter, iirc?
Thank y'all for the kind words! 😇
---
---
By JesalR Go To PostDoes anybody know if minipc.de is reliable/safe?Sorry, I know nothing about them.
Looking to make that home server/NAS and pick this board up, because it’s the only place I can find it in stock: https://www.minipc.de/catalog/il/2966

Vapes, how did you connect your old gpu to the OLED? HDMI -> DP adapter, iirc?
I tried an adapter however Nvidia’s drivers caused issues with it, it also couldn’t do VRR. I settled for connecting it via HDMI 2.0, 3840x2160/120hz/4:2:0.
That cost me 4:4:4 chroma sub sampling and HDR, but allowed for VRR and 120hz.
Ah, yes, I remember that. Well, I'll see if this hdmi extension works with the 3080, otherwise I'll either try another one of just use the angled hdmi cable. Won't be as clean a solution as having a 2x dp, 1x hdmi panel on the back of the case, but it is what it is.
Haven't done too much testing, but it looks like my FCLK is basically maxed out at 1833 MHz (which limits me to 3666 MHz memory frequency). I tried increasing the VDDG CCD voltage to max recommended limits (and many steps in between that and default) and couldn't get past memory training on POST when using any higher frequency.
Also, my overnight stress testing was successful. Looks like 3666 is here to stay. Now to tighten these timings...
Also, my overnight stress testing was successful. Looks like 3666 is here to stay. Now to tighten these timings...
By HonestVapes Go To PostI wish I had Kibner’s patience for RAM tweakinghaha
Most of it was really quick because I just set some loose timings, some default (safe) voltages and just kept pushing the memory and fclk frequency until I couldn't boot anymore. In this case, it was failing memory training, which happens during POST. Googled what could help with that and found it was the VDDG CCD voltage. Tried increasing that while staying within safe and normal ranges and still couldn't get past memory training. Bumped the frequencies back down, then ran stress tests while I either went about my day or slept.
From this point on, all my tweaking will occur just before bed so that I can run my stress tests while sleeping. So, it might be a couple months before I get everything set. lol

By Zabojnik Go To PostOk, what app do I use to turn all rgb off? It's time.MSI Afterburner or EVGA Precision? When all fails use duct tape.
By Zabojnik Go To PostOk, what app do I use to turn all rgb off? It's time.For the GPU? Gigabyte’s Aorus software. It’s terrible, enjoy.

By Zabojnik Go To PostOk, what app do I use to turn all rgb off? It's time.
You don’t

By Zabojnik Go To PostOk, what app do I use to turn all rgb off? It's time.

If anyone ever finds himself in need of 15cm DP 1.4 and HDMI 2.1 extension cables like these, let me know. I ordered new ones, these are spares.


By Laboured Go To PostEnjoy.


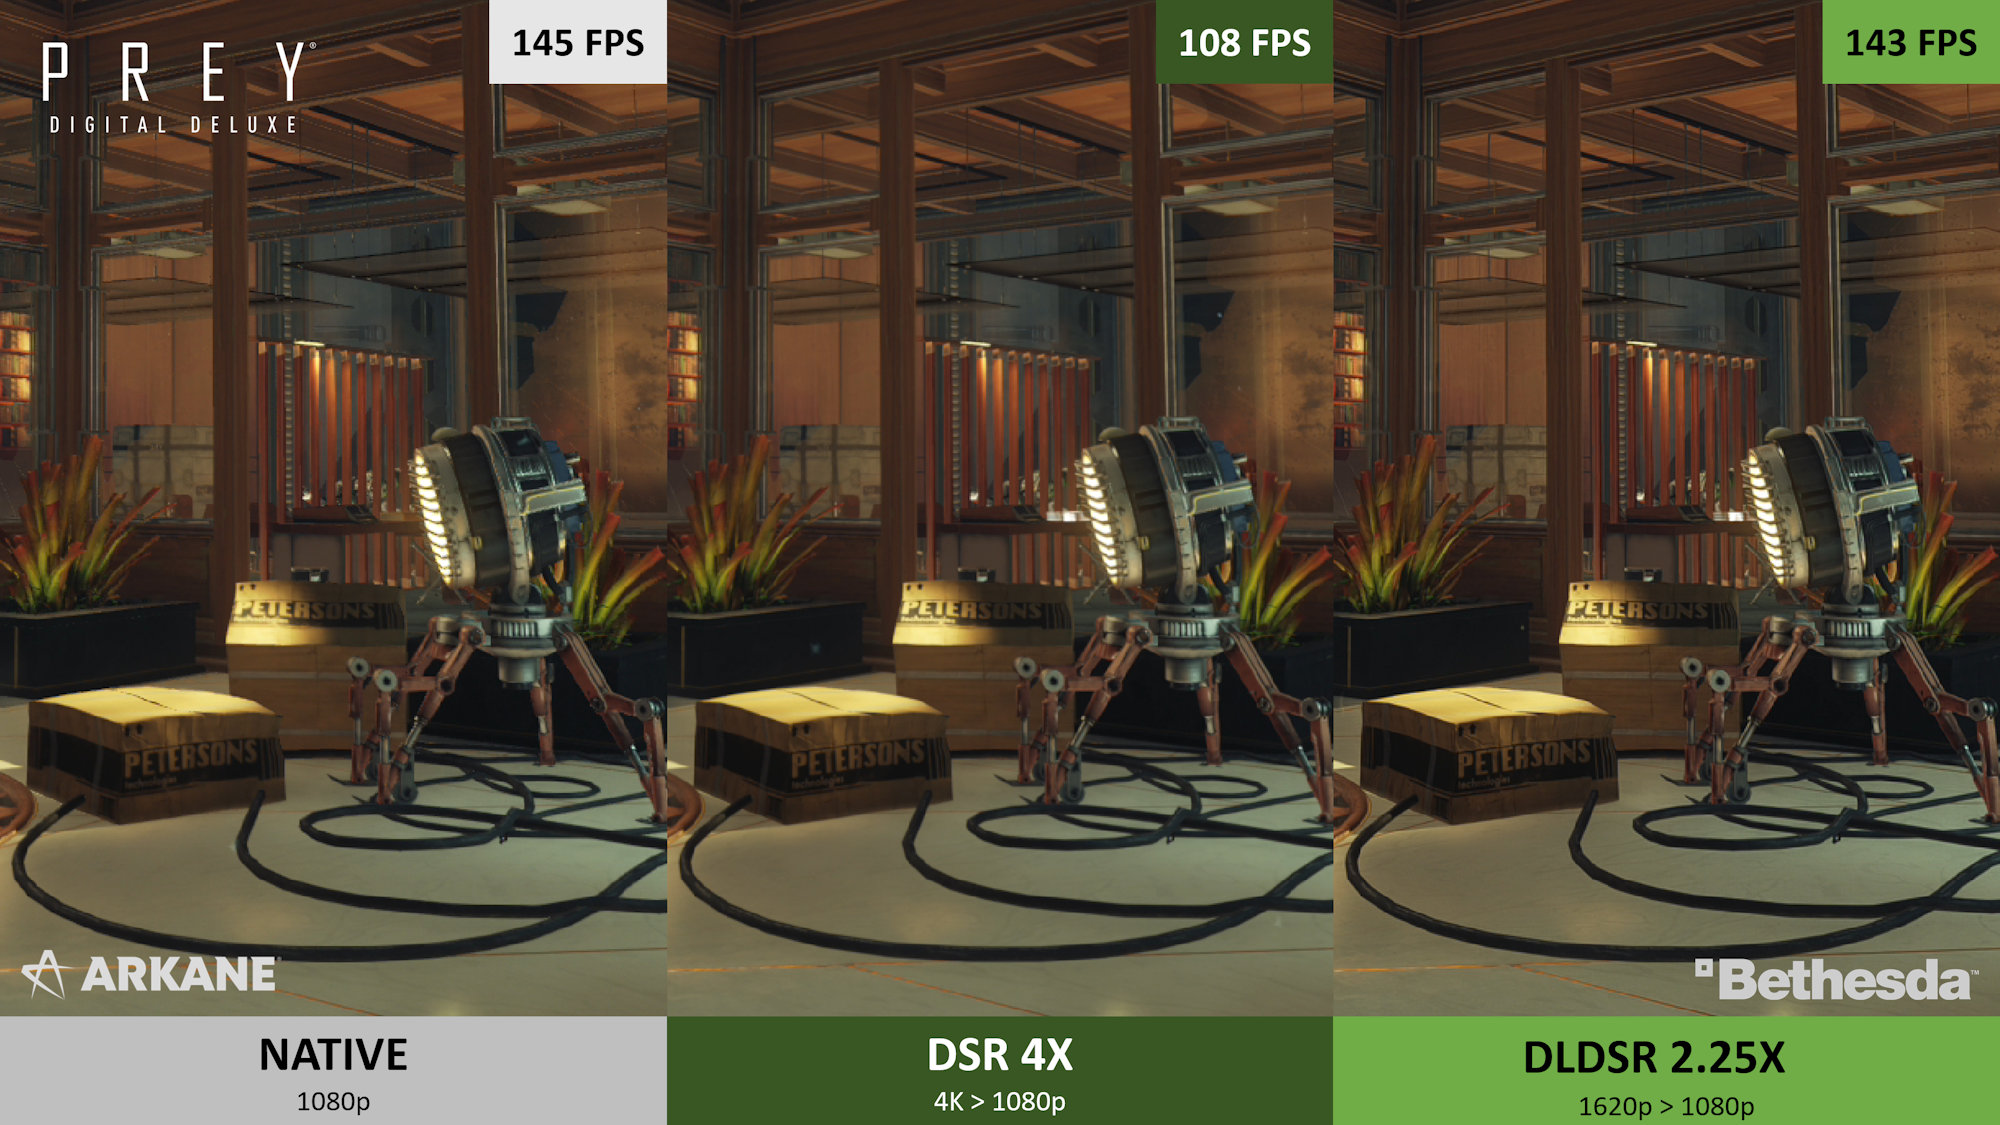
Our January 14th Game Ready Driver updates the NVIDIA DSR feature with AI. DLDSR (Deep Learning Dynamic Super Resolution) renders a game at higher, more detailed resolution before intelligently shrinking the result back down to the resolution of your monitor. This downsampling method improves image quality by enhancing detail, smoothing edges, and reducing shimmering.
DLDSR improves upon DSR by adding an AI network that requires fewer input pixels, making the image quality of DLDSR 2.25X comparable to that of DSR 4X, but with higher performance. DLDSR works in most games on GeForce RTX GPUs, thanks to their Tensor Cores.
Furthermore, NVIDIA has teamed up with the author of a popular tool called ReShade. NVIDIA will be adding new custom ReShare FreeStyle filters into its GeForce Experience tool:
- SSRTGI (Screen Space Ray Traced Global Illumination), commonly known as the “Ray Tracing ReShade Filter” enhances lighting and shadows of your favorite titles to create a greater sense of depth and realism.
- SSAO (Screen Space Ambient Occlusion) emphasizes the appearance of shadows near the intersections of 3D objects, especially within dimly lit/indoor environments.
- Dynamic DOF (Depth of Field) applies bokeh-style blur based on the proximity of objects within the scene giving your game a more cinematic suspenseful feel.
- With DLDSR and SSRTGI combined, you can enjoy a remastered experience in classic games like Prey.

By Laboured Go To Post
Nice! Topher's AMD shares aren't going to like that.

Realised there's a deep kink in my GPU AIO where the pipes meet the radiator, bought some pipes with a 90deg end to replace the current ones. Any advice on the best way to replace them Vapes?
By JesalR Go To PostRealised there's a deep kink in my GPU AIO where the pipes meet the radiator, bought some pipes with a 90deg end to replace the current ones. Any advice on the best way to replace them Vapes?Take the components out then drain them. Easiest way would be to hold the radiator in a bowl and undo the fittings to drain it.
Then remove the fittings and tubes, replace with the new ones. Finger tighten the fittings, don’t go overboard.
Refill it with fresh coolant. If you use the same brand coolant, then you’re good to go. If you use an alternative brand then you’d be best off flushing the loop with distilled or deionised water first then filling with coolant.
Can’t be arsed editing.
If you don’t have a fill port somewhere in the loop currently, you might want to add one while you’re at it to make the whole process much easier. A squirty bottle for filling will help a lot too.
If you don’t have a fill port somewhere in the loop currently, you might want to add one while you’re at it to make the whole process much easier. A squirty bottle for filling will help a lot too.
Cheers, I think the radiator has a fill port, seems to be another G1/4 thread that I can open to fill. Will it be fine to refill without having the pump running? Don't want to end up trapping any air in there

Evga Queue 3.0 incoming
https://www.evga.com/support/queue3/
Not a fan of the changes personally but I’ve already gotten what I needed from the queue so *shrug*
Also, 12gb 3080 prices are higher than I expected… I don’t see why they need this with the 3080 Ti existing
https://www.evga.com/support/queue3/
Not a fan of the changes personally but I’ve already gotten what I needed from the queue so *shrug*
Also, 12gb 3080 prices are higher than I expected… I don’t see why they need this with the 3080 Ti existing
By JesalR Go To PostCheers, I think the radiator has a fill port, seems to be another G1/4 thread that I can open to fill. Will it be fine to refill without having the pump running? Don't want to end up trapping any air in thereYeah leave the pump off while filling. Put the cap back on, run the pump for say 10-20 seconds. Turn it off, open the cap and fill some more.
Repeat until it’s full.
By Celcius Go To PostAlso, 12gb 3080 prices are higher than I expected… I don’t see why they need this with the 3080 Ti existingNo FE this time so they can charge obscene prices and make even more money.
By Willkiller Go To PostNice! Topher's AMD shares aren't going to like that.
Wow no one took the bait.
I guess that's the "Lisa SIUUUUU" joke on the scrapheap then
By HonestVapes Go To PostYeah leave the pump off while filling. Put the cap back on, run the pump for say 10-20 seconds. Turn it off, open the cap and fill some more.Thanks. Now I’ve just gotta figure out how to power the pump away from the PC. It’s a 3-pin fan header
Repeat until it’s full.
By JesalR Go To PostThanks. Now I’ve just gotta figure out how to power the pump away from the PC. It’s a 3-pin fan headerYou can buy a SATA to 3pin header for a couple quid. Should find it on OCUK.


By HonestVapes Go To PostYou can buy a SATA to 3pin header for a couple quid. Should find it on OCUK.Oh nice, actually think the AIO had that adapter in the box.
RMA’d the Eiswolf 2 I got last month, replacement is cooler and doesn’t have the issue where the temp goes up when the fan is increased above 55%, so that’s nice
By JesalR Go To PostOh nice, actually think the AIO had that adapter in the box.
RMA’d the Eiswolf 2 I got last month, replacement is cooler and doesn’t have the issue where the temp goes up when the fan is increased above 55%, so that’s nice
Generally it’s best practice to connect just the power supply to the pump with the SATA - 3pin adapter and cycle the power with a 24pin jumper.
For just the block and radiator though, I’d take it out the case completely. Fill it as much as you can, connect it to the 3pin adapter and power the PC on to power the pump.
You should be able to almost completely fill it without powering up tbh. It’s a simple loop, just the block and radiator. Plus you can move and manipulate the two components while they’re out of the case to get out air bubbles.
I think I'll need to buy a couple of external wi-fi antennas, if I want to keep using the motherboard's bluetooth. And I do, because it frees up a USB slot, which are a premium commodity on this mini-ix board, considering the number of external devices I have. The antenna that Asus included ...
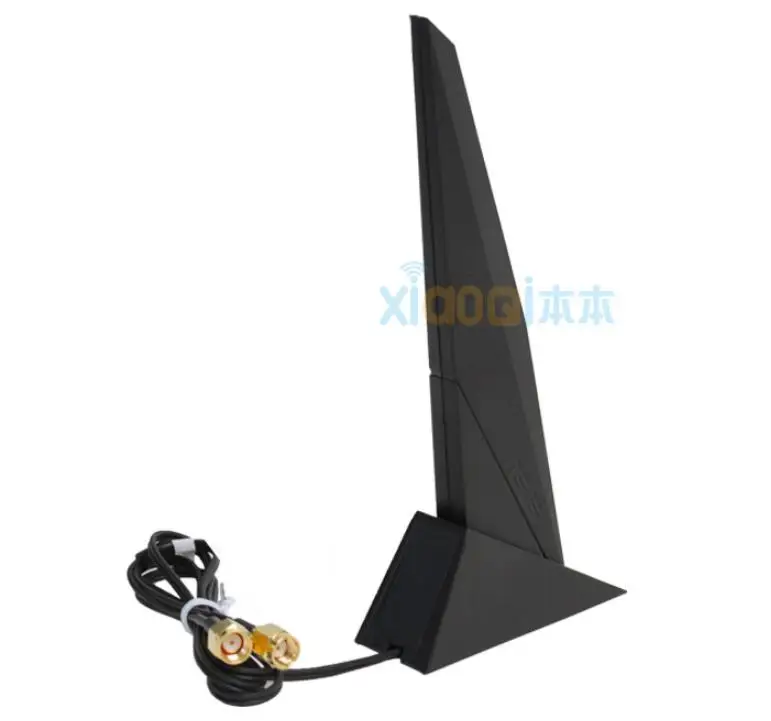
... works fine, but it's a desktop antenna. I printed a holder thingie and tried putting it inside the case, but the reception is barely better than with no antenna. I guess the all-metal mesh panels act as a pretty decent Faraday cage, who would've thought.
If anyone can recommend a pair of wi-fi antennas with articulating / 90° elbows, please do.
EDIT: Nevermind, bought.